

A lot of lolitas have a bias against over-processing or editing their photos, but removing a blemish or two and enhancing your natural features for the sake of a nicer image can be done without a big production.
Every photographer has their personal techniques and preferences, in this series, I'll talk a little bit about my basic process for preparing and editing photos. These little tutorials are mostly for beginners, rather than Photoshop experts, but will become more advanced as they progress.
For this particular post, I will discuss a simple way to brighten your eyes and touch up your make up as well as hide wrinkles and creases.

This part is really obvious, but you need to take a photo in order to edit one! I will be using the same photo from my last tutorial about hiding blemishes and blotches.
If you did not use the previous tutorial, you should prepare an image before editing by making sure that your white balance, contrast and color balance are all adjusted to the levels you desire. These settings are a matter of personal preference, but I prefer to make sure that my image isn't too contrasty or over-exposed.
This technique is meant to be subtle and realistic, rather than turn you into a plastic or porcelain doll. It's okay to have pores and texture to your skin! In future, I'll address more extreme techniques, but for this particular post, we'll keep things simple and as close to natural as possible.
As an additional note, this technique will work best for portraits, but can also be allowed to full-body images with clear faces.
Step Two: Identify the problem areas.
Most photos don't need significant editing, but just a few little minor touches to clean up some problem areas. Even the most beautiful of models, with professional make up artists to disguise any potential issues, still need the occasional assistance from a photo retoucher.
 |
| Identify what you want to change about the photo and go from there. Be objective, but don't be overly critical. |
Sit down and look at your image to decide what you want to alter. Look at the photo at 50%, 100% and 200%. Different sizes will reveal different things that you may wish to edit.
For this photo, I've already corrected the blemishes and stray hairs, so now I want to brighten up my eyes, darken my lower lashes and eyebrows, hide a couple of minor creases in my skin and smooth out my lips just a bit. All of these can be handled with the use of dodge and burn.
 Step Three: Brighten the eyes!
Now, the title of this tutorial is "Basic Dodge and Burn", which is somewhat deceptive. That is what I am doing, but it's not what I'm using.
The versions of Photoshop prior to CS5 have some issues when it comes to dodging and burning. These can work to your advantage in some cases (such as on eyes or to create very dramatic highlights on hair), but often do not look so good for use on skin. They tend to create a sort of faux iridescent effect, so I use another method that is much more gentle and much softer on skintones.
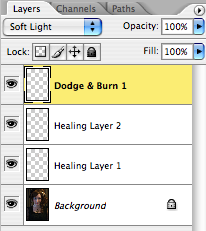
To begin, create a new layer on top of any others you may already have (I labeled this "Dodge & Burn 1"). Leave the opacity and fill opacity at 100% and choose the "Soft Light" blending mode, as shown to the left. Once you have created this layer, it's time to get down to the real work.

Likewise, your brush size will vary depending on your personal experiments. For a full res image (2042 x 3050px), I use a brush size between 30 and 60px for most areas.
Since I'm using a tablet for my edits, I set the flow at 80% and the opacity at 20%. Brush hardness is set at 0% and flow and opacity jitter are set to "pen pressure" under the brushes menu. This allows me to vary the opacity depending on my pen's pressure, so that I can be a bit more sensitive to the changes.
 Next, you will need to set your colors to the default black and white. The fastest way to do so is to click the "default" icon next to the color swatches or press the "D" key without any modifiers.
 I prefer to dodge before I burn, so we'll need white as our foreground color. Press "X" or click the swap arrows to bring white to the front. Then, lightly "paint in" the areas that you want to lighten. For this image, I have started with my eyes. Follow the natural reflections already seen in your subject's eyes and go slowly.
 |
| Brighten the inner ring of the iris and the whites. Leave the outer ring and pupil fairly dark. |
 |
| How much you do to the eyes is up to you. I like to put in quite a bit of drama, especially if the image is going to be scaled down for online posting. |
The next trick for cleaning up my make-up can be done on the same layer as the one we've been using, but if you want to keep things organized more strictly, feel free to create a new layer as necessary.
To start with, I want to tidy up my eye make-up. One eye's liner got a bit smudged and I'd like to even them out. Using the same technique as you did to darken the iris edges and pupil, slowly paint in the missing eyeliner along the waterline.
Next, decrease your brush size to match the size of your eyelashes. In my case, I used a brush size 3, with hardness at 85%.
Now, if you have a tablet, open the brushes menu to the shape options, choose the "size jitter" check box, then select pen pressure. If you are working with a mouse, you'll want to skip the next paragraph or so.
Having selected your brush, draw in the lashes, one by one, on a light opacity. Lift the pressure before the tips, so that they taper gently. Gradually darken the lashes you have drawn in, using the existing lashes as a "template". Continue working until you have nice, thick lashes.
If you are working with a mouse, make a new layer just for the eyelashes. Set this layer to soft light as with the dodge and burn layer. Next, select your brush tool and set it to 3px, 50% opacity and 85% hardness.
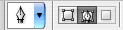 Finally, select your pen tool from the toolbox menu. At the same time, make sure that you have the Stroke icon selected in the top left of the properties menu.
Use the pen tool to create a curve, like so:

Right click on this path and choose "stroke path". In the menu that opens, choose "brush" and leave "simulate pressure" selected. Delete the vector and repeat. Continue this process until you have a row of full lashes!

You can also copy and paste the lashes, rotating as necessary, for a faster result.
(For the sake of this tutorial, I finished the lashes with my tablet and the brush took after the above screenshot.)
This same method is used to gradually darken and definethe eyebrows, as well.
 | |
| Eyes, check! Eyebrows, check! |
One of the biggest things you see in photos that people dislike is texture. A photograph, because it is frozen, gives the viewer much longer to look at a person than meeting them in person would do. This allows certain normal characteristics to come across as flaws, rather than simply traits. For example, the creases in my lips, the slight smile lines under the curve of my eye, and the upper curve of my chin all are slightly unflattering.
These are corrected in much the same way that the eyes were brightened.
Choose the white color as your foreground once again and a small, soft-edged brush. Carefully "paint" on the dodge and burn layer as before, to fill in the slight creases. I chose a size 9px brush with 0% hardness at 12% opacity for my lips and the sharp crease beneath them. For the shadow under my eye, I lowered the opacity to 5% and the size to 12px.

Here, you can see the actual process of the dodging and burning against a blue field:

The white portions lighten the image, the black darken it. This allows the contrast to be increased gradually.
Step Six: Self-critique the image.
Once you've finished your editing, take a few minutes to an hour away from the screen. Then, come back and view it at 100%, 50% and 200% to see if you missed anything.
Leaving the image along for this period of time allows your brain to switch processes from the "creative" used to edit the image to the "analytical" used to examine and correct any flaws still in place. If you see something else that needs tweaking, go from there and correct the remaining issues. Repeat the self-critique process until you're satisfied.
Having done this myself, I came up with this final image:

I hope you found this tutorial useful! If you have any questions, comments or contributions, please feel free to post in the comments below!
2 comments:
I really like the tutorial! However I think in the final image the eyes look kind of creepily *too* defined? If that makes sense? Like doll's eyes? x_X
I understand! ^^;
I don't typically use this method to that extreme (I normally only lighten the iris very slightly and darken rather than redraw lashes), but I wanted the difference to really show between the before and after.
Post a Comment